

"Sneaky Peaks"
"Electric" Lanterns
In this article we will explore a practical application of
the "audio" control of scale lighting.
Here is a bright idea. Light bulbs are rated in watts, and so are audio amplifiers! A light bulb lights when it sees enough voltage to make the filament glow. The bulb does not know, or care, where that voltage comes from, it could be a wall outlet, a transformer or power pack plugged into a wall outlet, or it could be a battery. It could even be an audio amplifier...
Miniature lamps (or micro-lamps, as they are sometimes referred to in scale sizes) have a wide range in which they operate, from a dim glimmer to startling brilliance. With the right audio tracks, you can "animate" a lamp(s) to express any number of illusions for you! With the right audio tracks, you can make a lamp appear to be the flame in a lantern...
We went into the recording studio to build "tracks" for your railroad!
The tracks are "ready to run", and free for the downloading. We built the SAME "Electric" FX system you will learn how to build here. We tweaked the soundtracks in the studio until they "looked " good on a number of miniature lamps, and then transcribed them into sound files for you. We'll show you step by step how to download these tracks and create cassette tapes that will look absolutely real in your new "Electric" Lanterns! Even if you need to buy all of the parts, the whole system will cost less than twenty-five bucks!
This is not Audio-animatronics (see: Enginear's Notes). Although by today's standards audio-animatronics control was fairly simple, it could not hold a candle to the elegant simplicity of "Electric" FX! What we will explore here is infinitely more direct! It is a pure form of control that can be ridiculously simple and inexpensive to apply, once you have the audio programming! And it is much more expressive and effective than ANY of its predecessors ever were! Be sure to look through the Designer's Notes too.
This series is in three parts:
- Part One: The Soundtracks
- Part Two: The "Audio" System
- Part Three: Installation
- Designer's Notes
- Enginear's Notes
Part One: The Soundtracks
In this part you will learn how to create cassette loops that will serve as the program material in your "Electric" Lanterns FX system...
The secret to the magic of "Electric" fire effects is in the audio program itself. Fundamentally, a flame is just random flickering. But a candle burns differently from a lantern, a gas lamp, or a fireplace. Careful observation of each light source reveals that each has its own specific characteristics. Extremely unconventional sounding, but appropriate "looking" dedicated audio programs have been developed for each application described here.
What you will need:
- A computer and software capable of playing a 16 bit, 44.1khz stereo sound file (QuickTime 3 movie "soundtrack")
- On a PC, you'll need a sound card with stereo line level outputs
- A cassette recorder with line level inputs and a "pause" button
- A stereo patch cord
- A standard 30 - 60 minute cassette tape (or answering machine loop cassette tape)
What you'll do:
Downloading the files...
Downloading is easy. Go to the download page to find the "Electric" FX files you want for your model railroad. Click on the titles to begin downloading to your hard disc. You might wish to create a new folder into which you will save these files, this can make things less confusing later. These files are 16 bit, 44.1khz sample rate stereo sound files and are therefore several megabytes long. You may wish to schedule your download for a time when the internet is less congested (ie, late night, overnight, or early morning). In any event, be prepared to wait awhile for each file to download completely.
WARNING!
THESE FILES ARE DESIGNED TO BE SEEN, AND NOT HEARD! TURN THE VOLUME DOWN BEFORE YOU PLAY THEM, IT CAN BE UNNERVING!
Set-up for transcription...
Once you have collected all of the files onto your computer you are ready to set-up for transcription to cassette. The set-up is straightforward. You will need to make the stereo audio connection between your computer and your cassette recorder by connecting the left and right audio line level outputs of your computer or sound card to the left and right audio line level (or "record in") inputs of your cassette recorder with a standard component stereo phono patch cable (most likely a male RCA to male RCA pair). Matching left and right channels between the machines is not important, as long as both channels are connected. Open the sound file in any application that can play the file WITHOUT converting it. Hit the space bar (or the play button on the screen) and listen through the file in its entirety. Watch the counter if there is one, or a clock, so that you can recognize the end when you get to it. Repeat this process with each of the files you have downloaded as this will help you to make some of the editing decisions in the next few steps.
 At some point
you must decide what type of cassette tape format you will mix
down into; either an answering machine continuous loop, or conventional
two sided cassette (my favorite). Each type has positive and
negative aspects associated with it.
At some point
you must decide what type of cassette tape format you will mix
down into; either an answering machine continuous loop, or conventional
two sided cassette (my favorite). Each type has positive and
negative aspects associated with it.
The phone answer machine loop tape is easier and faster to create, which is a positive in that you can get to playing it sooner. It is much shorter in length so it takes less time and fewer passes to fill it with sound. Another plus with the loop cassette is that once you start it playing you can forget about it until you are ready to stop it (it will just keep going continuously, no rewinding or flipping it over). On the negative side, the continuous loop cassette will likely be loaded with lower quality tape. This is not too critical since "Electric" FX are not heard. Things like tape hiss (tape noise) or minor distortion will be inaudible. Still, lower quality tape will wear out sooner resulting in poorer reproduction, potential dropouts and potential tape failure (a tape being "eaten" by your player). It will also wear out sooner because it plays the same piece of tape more times in any given time period (putting you right back here, REtranscribing sooner). The longest loop cassette I have ever seen is four minutes, if you decide to go with this format and can find a longer loop tape, buy it!
The standard 30, 45 or 60 minute cassette is probably the best way to go if you have some patience during the recording process, and if you don't mind flipping (or rewinding) the tape once in a while (If you choose to use an auto-reverse deck, this would not be a problem). You can buy longer running 90 minute cassettes, but this is a thinner tape and more susceptible to becoming a cheap player's lunch! In general, standard cassettes are loaded with higher quality tape which will sound better and likely make a better recording (quieter, less likely to go into distortion, etc.). Additionally, you can create a more pleasing composition within the longer format, with more quiet moments and variation which will appear completely unpredictable. Finally, this format will last longer than loops in that it will only be "handled" by your player once or twice in an hour.
In either event, you should consider making a master cassette from which you can make copies for use on your railroad. This eliminates the need to go back through the recording process described here when (not if) your tape wears out. It is easy to make duplicate tapes on any dubbing deck. A dubbing deck is the kind with two cassette machines in one unit, many ghetto blasters have this capability and will usually do a suitable job for our purposes, if you do everything described below.
Transcription to cassette...
Ok, you have chosen a cassette type, you've familiarized yourself with your new audio files and you are plugged in and just about ready to start recording... but hang on! Before you load that cassette into the recorder, read through this check list first!
- You should already be familiar with the sound file segments you have downloaded. You probably already have some idea of the way you want to combine them onto the tape. If you do, go for it! There are really no wrong ways to do this. Try to vary the the sequence, separate tracks with quiet spaces (record nothing for a few seconds). Another trick to vary the effects is to reverse the left and right channels at one end of the patch cord when recording the same track several times! Or try this trick, unplug one channel to the recorder for a pass, then on a later pass unplug the other channel. This trick can also be done "on-the-fly" using the recorder (or computer) volume controls, as long as you can remember to reset the levels exactly when you are finished! And, as always... have fun!
- It is always a good idea to clean the heads and tape path of the tape machine before you do any recording. If you do not know how to do this, you should learn right now... keep reading. You are simply swabbing the deck! Get some Q-tip type cotton swabs (the wooden stick kind are available from your pharmacist and are often easier to use), and a bottle of isopropyl alcohol and keep them around. This will cost about $2.00 and is a worthwhile investment. You will want to clean your playback deck(s) every ten hours of actual playing time as a matter of routine maintenance. This can literally make a world of difference. Dip the end of a Q-tip into the alcohol and wipe and rub the head(s) and anything along the tape path (capstan and pinch rollers), then repeat the process with several dry Q-tips. Let it dry completely for a few minutes before inserting a tape.
- If you have or can borrow a tape head demagnetizer, you should use that too. If you cannot find one, any magnet that will fit into the tape path area will do the job. Again this is simple. First, turn the power to the tape deck off! Just move the demagnetizer or magnet around in a random way near the tape path. You must be careful not to actually touch anything, especially the head(s), with the demagnetizer or magnet! But you should move the demagnetizer tip or magnet as close as you can to the heads without actually coming into contact with them. Keep the demagnetizer or magnet moving at all times and make two or three passes in random directions. One final word of caution, if you are using the kind of demagnetizer that plugs into the wall, turn it on, AND off at arms length away from the deck. You want it on as you move it in toward and out away from the deck. Keep the magnet or demagnetizer away from your computer, monitor and any storage discs. Commercial cassette cleaner/demagnetizer "tapes" notoriously DON'T do a very good job, but they are still better than doing nothing.
- If you have the software and hardware, and if you feel confident enough, you might want to do some or all of the editing in your computer. Digital editing is outside the scope of this article, but if you are already familiar with it, it is an excellent way to break up and reassemble the existing files. You can copy and paste away. You can fade in, fade out, cross fade between tracks, combine tracks, stagger tracks... go crazy and have fun!

- If you are using a continuous loop cassette, look into the open edge at the exposed tape. If you see the splice where the two ends of the tape come together, go ahead and insert the cassette into the recorder. If you do not see the splice, put the tape into the recorder and advance the tape a few seconds. Now check for the splice again. Keep repeating this until you find the splice point. You will want to start your recording somewhere after the splice, and end the recording sometime before the return to the splice. If you have a stopwatch or sweep second hand, time the tape. There is most likely going to be a momentary dropout at the splice point, and the object is to insure that any dropout appears during a period of silence before the beginning and after the end. There is another recording approach to this splice point dropout problem, see: Enginear's Notes, FAQ&A
- With a tape in the recorder and the recorder in PAUSE, drop the recorder into the record mode (usually by pushing the record and play buttons at the same time). Now hit the space bar (or click the play button on the screen) and play the entire soundtrack from your computer and watch the levels on the recorder closely. The levels should NEVER go into the red, not even for an instant. Like other recordings you may have made, "Electric" FX depend on dynamic range. But unlike other recordings, "Electric" FX are effectively impervious to tape or recording noise. When the loudest voices push the meters up to or near 0 vu, you have the levels set right. You should be able to leave the levels in the same place for the rest of the recording process since the individual sound files were all level matched in the studio.
- NEVER use noise reduction such as Dolby B or C! It is not necessary and the cheap player will not be able to decode it. Even if the player you intend to use has noise reduction, it is better to refrain from using it. Again, it is simply unnecessary, and unless everything is working perfectly, it can cause some less-than-natural results.
- You should have your reference system "bread boarded". That is, you should have it operational with the lamps you will actually be using laying around, in view. Keep it handy, so you can test your finished cassette.

- DON'T WORRY! "Electric" FX are incredibly forgiving. Even when you screw them up they usually still work great. All the warnings above are there because we want you to have the best looking lanterns possible. Have fun, you'll know if you actually want to record something over again... and that's easy too!
OK, you are about to make your first mix-down pass. If you have the first sound file cued up (ready to play) in your computer and a cassette loaded in your recorder, and if the recorder is in record mode AND on pause, you are ready to go. Hit the space bar (or click the play button on screen) and take the recorder out of pause, in that order. When the file is finished playing, the computer should automatically stop. You should drop the recorder into pause BEFORE the file is finished playing on the computer, if you want a continuous appearance to the effect. Re-cue the sound file. Hit play on the computer, and then pause on the deck and repeat the process above. You will keep repeating this sequence until you have filled up your cassette tape. It is just that simple... that boring, that tedious, but that simple!
Here are a couple of tips to help make your mastering go faster. If you have taken the advice above and are making a master tape for duplication to working copies for use on your railroad, you can fill only side A of your master tape. Then when you are duplicating you can just flip the copy over, rewind the master, and fill the B side of your copy with the same program. This will not only save time in the mastering process, but also saves time when playing the copy on your railroad system. When the cassette finishes playing through your "Electric" FX system, you simply flip it over and begin playing again immediately, rather than waiting while a single sided cassette rewinds in order to replay it. This also cuts down on the amount of "wasted" tape handling (rewind wear and tear) to your cassette copy.
If you are planning to insert a quiet space just let the recorder continue to record for a few seconds while you are cueing up the next file (keep your ears pealed for computer clicks or pops while files are loading). I know at first it seems strange to have lanterns that go on and off around your layout, all by themselves. "It ain't natural", and yet, it is kind of cool too. You are going to have some dropouts with normal tape operation anyway, and it is fun to watch visitors react/interact when they do notice. A period of silence is easy to do and really adds character to the final performance. And, it is an easy way to fill up a tape!
Part Two: The "Audio" System
In this part you will learn how ridiculously cheap and simple it is to create...

Figure 1
Not much to it, is there?
What you will need:
- About fifteen bucks
- Enough time to run to Walmart, or K-Mart, or...
- A transformer to go between the wall and your cassette player (or, yuk... batteries)
- A few feet of 18 ga. two conductor wire (depending on the scale and size of you layout)
The decisions you will make at this point will be based on
several factors, all having to do with the nature of your specific
railroad.You might consider the following:
Pike size? If your layout is smaller than 4 'x8 ', a single stereo system is likely all you will ever need. Larger layouts will generally be best served by a distributed approach, or multiple "basic" stereo system installations. (You could go wild and install multiple distributed systems!)
"Basic" stereo system? (see: Figure 1, above) This is the easiest and cheapest way to go, and therefore an excellent first project. If you are really pleased with the results, you can always install additional single stereo systems later (my second favorite approach!).
Distributed system? Virtually identical to a single system, with three exceptions: 1) You will run a pair of busses (left and right channel) around your layout, "tapping watts" at various points by splicing into these busses. 2) You must use "matched" lamps for this. 3) You will likely need an amplified system. This approach can be better on larger layouts and club railroads (see: Figure 2, and Figure 3, below). There IS a limit to how many lamps you can safely attach in parallel to tiny headphone outputs (generally rated between .5 watt, and 3 watts). You may need an amp or car stereo deck with amps to drive more than two 1.5v lamps!
Which lamps? If you are going to build a single stereo system, and are going to use small 1.5v lamps (for example, Circuitron # 800-7411-02, 13ma., pkg. of 2), you may be able to use the headphone output of your new cassette player. Try them out together. If, on the other hand, a distributed approach with an external amplifier is right for your railroad, you might try 12v lamps (for example, Circuitron #800-7440-06, 30ma, pkg. of 6 ). In either case, I suggest you go for a single "reference lamp" throughout you layout for more predictable results. Ask Circuitron for their "Mitey Lites" miniature lamp catalog, they have a large selection, and are always willing to help you figure out the right choice for your particular application. As long as your system can drive them, any pair of lamps WILL work, but it is always best to work with matched lamp pairs.
How many systems? Don't laugh, two basic systems can more than double the fun and interest of this effect! Once you have gone through the downloading and mastering processes, you are only $14.95, or less, away from your next system. When you see the results, and observe others responding with smiles, multiple systems will start to sound like a pretty good idea. Also, unless they are started at exactly the same time, multiple systems never link up exactly, so that you have a constantly varying "mix" within scenes and around your pike! Very nifty!
Go to Walmart or K-mart or any mart that sells ridiculously cheap cassette player/headphone bubble packs, and purchase one (or more)! You should not need to spend more than $14.95 plus tax, or you should probably try another mart. I literally did this. I went to Walmart and asked a clerk for "the ridiculously cheap cassette player/headphone bubble packs", and he pointed me to the end of isle 14... during that sale, they were $5.00 plus tax! While you are there, if your cassette player doesn't come with one, look for a "wall wart" (a step-down transformer that plugs into the wall and your deck). If you buy them separately, make sure that the transformer delivers the correct voltage for your particular cassette player.
By the way, you should be able to use almost ANY cassette player for "Electric" FX, as long as it can deliver enough voltage (see: Enginear's Notes). If you have an old ghetto blaster, home stereo deck or car stereo deck you can allocate to the task, you might be able to use it! Always clean and demagnetize the heads and tape path of any machine (see above). If you choose to use a home stereo tape deck, it will likely have a headphone output for which you may need a stereo 1/4" phone to 1/8" mini phone jack adapter (available at Radio Shack, number 274-367). If you choose to use a car stereo unit, you will need a 12 vdc, 3 (or more) amp power supply (Radio Shack, number 22-504), or old train power pack to deliver 12vdc power to your system. You should use the car stereo player's amplified outputs to drive your lantern system, just set the volume carefully! I used a 150 watt P.A. amplifier (because it was handy) to drive one little 12v doll house lamp as a "reference monitor" when preparing the "Electric" FX soundtracks. As long as there were no pops or clicks, such as transients from turning the Mac off while the amp was still on (which I did... twice), the little lamp performed flawlessly. The point is that you can use an amplifier that is over-rated, as long as you realize that there is a higher risk of frying lamps! Just turn it down (again, see: Enginear's Notes). The little disposable decks mentioned above are a better choice if you will be using 1.5v lamps. With their larger built-in amplifiers, car decks are better suited to the tasks of "Electric" FX (or Point Source FX described elsewhere in the site). If your particular deck has auto-reverse, all the better, you'll never have to flip a tape over.
If you do not already have some suitable wire laying around, you will have to go to the local hardware or electronics store to find it. If your layout is small, or if you only intend to use lanterns in one place on your layout, you may not need additional wire. The headphone plug and wires that come with the cassette player may be enough for your installation. Any small gauge (ga) two conductor wire (18 ga to 20 ga) will work for the short lengths and low voltages involved in these installations. If you will use a distributed system with several lamps tapped along a buss over 15 feet in length, you can buy 16 - 18 ga. zip cord for the busses.
If your cassette player came with headphones, they are probably disposable. You can use the cable from them to feed your lanterns system (maybe you could use the speaker elements for Environmentals?). Many headphone cables have a small square nut that is there to keep the two wires from separating. If you want to separate the wires, slide this nut down toward the mini-phone jack in order to achieve the maximum separation. You should be able to just peel the two wires apart all the way down to the nut/plug.
On larger pikes, or in larger scales with 12v lamps, an alternative system could be a car stereo cassette deck with built-in amps (see: Figure 2), and/or RCA type line level outputs that can drive a larger external amplifier (see: Figure 3). A 30-watt per channel amp "should" be able to provide all the lantern firepower necessary for all but the largest (club) layouts (see: Enginear's Notes). An added benefit of the car stereo deck is that most of them are auto-reverse, allowing hands off operation (no flipping the tape over).
Another option is to use a cassette ghetto blaster with built-in amps (see: Figure 4). If you can afford one with enough voltage to drive lamps (see: Enginear's Notes), it can be an all-in-one package that just plugs into the wall. You will have to modify it by opening it up and disconnecting the internal speakers (which you can save for "Point Source" duty). You will then have to "break out" the amplifier leads in order to feed the busses to your layout. You could also feed lamps or an external amp with the headphone output, but that will invariably "defeat" the internal amps (its either/or).
WARNING! Some amps may not be able to drive 12v lamps! If you want to use 12v lamps, always do a quick check by hanging a 12v lamp on the output, first!
The Hot Rod System. Depending upon the voltage the amplifiers in the deck can deliver, and the lamps you use, you can drive from 2 - 12 or more lamps from busses, with this system! The amplified outputs should be bussed with 16 - 18ga. zip or "lamp" cable (For runs of over twenty feet, use 14ga. wire to reduce line loss).

The Luxury System. Depending upon the size amplifier and lamps you use, you can drive 24 or more lamps on each channel with this system! The amplified outputs should be bussed with 16ga. zip or "lamp" cable (For runs of over twenty feet, use 14ga. wire to reduce line loss). The Y adapter cable is available from Radio Shack, #42-7425, 1/8" stereo to 2 male phono, for $4.49.

Fig. 4
The All-in-One System. This is a good way to go if you can afford to buy, or "retire", a ghetto blaster with enough firepower to drive a few lamps!

If your layout is small, or in a small scale, you may not have to do anything else to prepare your system for installation!
Jump right into Part Three!
Part Three: Installation
Lets explore some ways to apply and conceal your "Electric" Lanterns...
What you will need: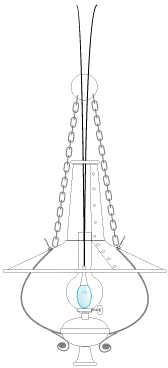
- (1) "Electric" Lanterns FX cassette tape
- Your new cassette player
- A headphone cable (one way or another...)
- (2) or preferably more, 1.5 v lamps
- The usual tools (drill, electrical tape, utility knife, wire cutters)
- A couple of lanterns...
What you'll do:
You can hardly go wrong installing "Electric" Lanterns... it is literally almost impossible! What you WILL do is blow up lamps... it is almost impossible NOT to! For this reason, you should always have plenty of spare lamps on hand, and you should always set-up and test your new system with "bare bulbs" (lamps that have not yet been installed into lanterns).
Although there is really no wrong way to do it (if it looks good to you), I have included some art and a "check list" of suggestions for you to look through, to guide you in the right directions. Look through the following, it should be helpful...
"Electric" Lanterns Installation Check List:
- The traditional method for installing lighting is to install the lamp(s) in the model building, lamp post, or lantern itself, and then run the wires down through the scenery and bench work for connection to the feed or buss under the layout. "Electric" lighting is no different! The best installation technique for you, is the one that works! If you already have lighting installed, you can drive it with "Electric" FX, instead of your old power supply!
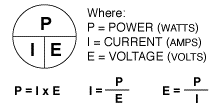
- About Miniature lamps (voltage, current draw, choice) Miniature lamps come in many shapes and sizes, and many power ratings. Power, or wattage (P) is the result of current (I) times voltage (E). An easy way to remember this is the "PIE" chart (at right). You can solve for any one factor if you know the other two (all 3 formulas are shown directly below the chart). This can come in handy when picking equipment, and when matching lamp strings to amplifiers. Audio watts are technically different than lighting watts, but you can "roughly" compare the two for circuit loading purposes (see: Enginear's Notes). Usually, you will know the voltage and current ratings of a lamp(s) you are using. Ask Circuitron for their "Mitey Lites" miniature lamp catalog, they carry a large selection with all the specs (size, shape, voltage and current draw). There are several other good sources for scale lights (GRS Model Lighting, Miniatronics, etc.), check the Walthers catalog. And don't overlook the doll house suppliers, they have some great 12v stuff!

- A Single Reference It is always a good idea to use a "standard" lamp throughout you modeling. Keeping track of many different lamps and where they all go can be perplexing. It is also a lot easier to keep replacements on hand if you only need to order one or two. I suppose you could get creative by "tuning" different rated lamps on the same circuit, but it is easier and safer to keep all the lamps the same on any given circuit. Just use additional circuits, "tuned" any way you want!
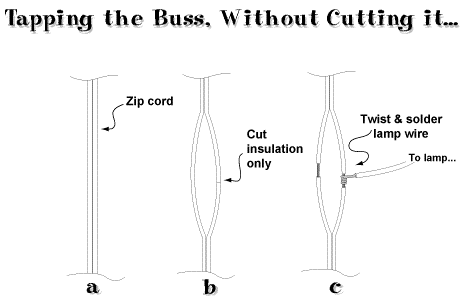
- "Tapping" a buss Most any splice will work. You can cut the buss anywhere you need to attach a lamp, and either twist the wires together and electrical tape them, or twist and wire cap them back together (good for changing burnt out lamps). But there is also a way to tap into the buss without cutting it (see below). The idea here is to keep the buss continuous, with no loss at splice points! With a utility or X-acto knife, separate the insulation between the two conductors of the buss (a), and pull them apart, three or four inches should be enough. Then, cut the insulation, but not the wire strands (b). Pull the two ends of the insulation apart 1/4" or so. If you have mechanical strippers, this is quick and easy. Then just twist the lamp wires onto each exposed buss wire (c), you do not have to solder these splices, if you prefer not to, but soldering precludes intermittent connections. It is just as easy to cut off old lamp leads, and then twist and resolder the new leads over them. In either event, you will want to protect the splices with electrical tape. It is also a good idea to "stagger" the splices an inch or so from each other, to reduce the chance of shorts.

- Using a "Bulb" as a Lantern Chimney Miniature lamps come in many shapes and sizes, one of them may be the perfect size for a scale lantern chimney (depending on the scale you model in). I have tried to keep the magic site "non scale specific", but if you model in Z or N scale you may have to resort to fiber optics. For HO and larger scales, you can find miniature lamps that will make a believable scale chimney. In the larger scales (S, O, 1/2", and 1" or doll house), there are many appropriate shaped sizes to choose from, you may already have some. One of my favorite shapes is a round "globe" lamp. I was given a few of these, but never knew where to get more of them (if anyone knows... ). In 1/2" scale, Ozark Miniatures makes a white metal casting that would work great. Keep in mind that even miniature lamps develop substantial heat, so you cannot use plastic or PVC to build your lanterns if you are going to light them. All of the lanterns on the IDH are scratch-built from brass and copper, which makes them excellent heat sinks (but a pain in the backside to build). I chuck up solid brass round stock in a hand drill, and "turn" the basic shapes of the top and base using jewelers files as tooling. Then I machine-in details, and then solder them together with brass rod and copper wire. On the IDH, I use actual glass chimneys (doll house, and custom hand-blown). The advantage to a separate chimney is that it acts as a screen onto which the light is projected, especially if the chimney is frosted.
- Sharpie pen "gels" Theatrical lighting uses thick translucent sheet plastic gel material in metal frames through which the light is projected, to color light. With scale lighting, we can substantially simplify the technique. All lamps have glass globes. Sharpie Pens (available at all stationery and office supply stores), will write on glass! These pens (actually felt-tip markers) come in several colors, including red, orange, and yellow. I buy the "fat" ones. Whether you utilize a lamp for direct, or indirect viewing, you can color the light a lamp emits with a Sharpie pen. This works really well, and on any lamp (including existing lamps)! You can even mix the colors on the glass itself, going from red to yellow for instance, to simulate a flame, or fire. A nifty trick is to color all of a lamp with red, except for a spot in the middle, creating a hot spot (that "star filters" when viewed directly), but with a warm glow around it. Or you can color one side of a lamp in a building with color to project onto a window shade, while leaving the other side clear to fill the structure with ambient light. Also, you can use a black or blue Sharpie to "crop" or direct light, with a fair amount of predictability.

- "Dink Around" Time ("I Dink, therefore I am... ") This is quality time spent acquainting yourself with your new medium, and perfecting a magic trick, and is absolutely necessary! Professional lighting designers call this "focusing", ostensibly the lights. But my observation has been that they are actually focusing their vision of the show! Whatever you call it (or blame it upon), it is essential to the "successful" design process. I have spent many hours studying lamp behavior (some say in a trance... or coma!), but the effects I end up with always get the smiles (Like Roger Rabbit: " ...only when its funny!"). The pros have roadies and techs to crawl around on catwalks and lighting trusses for them, they have expensive and sophisticated lighting devices and controllers, and the pros have experience and background in which they base their designs. But ultimately they wind up doing... what looks good! You have the same exact option! Take your time.
- Setting "Volume" Levels This is somewhat subjective. Ultimately, what works and looks good to you (without frying lamps) is the right volume setting. What you need to know is that the soundtrack has a dynamic range optimized for the full range of expression of miniature lamp filaments. At its lowest moments the filament should only glow dimly, at its brightest moments it will appear to almost strobe. When you set up the levels, ALWAYS start with the volume completely off, and take your time turning it up... slowly! Whatever the lamp is doing now will invariably be different in a moment. You are setting OVERALL levels, take your time. You can always turn it up more... if the lamp is not "smoked"! Focus, focus, focus! (also, see: Enginear's Notes on driving an amp into clipping)
- Lamp Life Miniature lamps do not always blow up immediately when you supply them with higher than their rated voltage, they may continue to light for several hours before they fail. You may get a stunning effect for 10 or 20 hours... on a sub-miniature lamp rated for 500 hours of operation! This can get expensive. In a perfect world, miniature lamps want to see perfectly filtered, pure, constant DC at or below their rated voltage. "Electric" Lanterns soundtracks deliver just about everything else! The signal is constantly changing in frequency and voltage, and can be very hard on the little filaments involved. The effect is so much fun, that you will want to "crank it up", but try to resist. As long as the momentary peaks of the program do not exceed the rated operating voltage of the lamp, you will obtain a respectable service life from it. It is also in the nature of the soundtracks, that most of the time your lamp will be receiving well under its rated voltage, too. Just turn it up enough to achieve animation, until you get a feel for your specific lamps and system.
- Physically Adjusting Lamps Subtle changes in lamp orientation can produce dramatic differences in the visual effect. There is no science here, it must be a trial-and-error effort, and is completely subjective. In fact, sometimes it seems completely haphazard! But, it is simply done by eye. Viewing the filament through the end of the lamp can amplify apparent brightness and star filtering when compared to viewing it from the side of the lamp (the end presents a thicker lens). There can be a number of different appearances in between these two angles. I often "mount" the lamp on a short piece of copper wire with a drop of five-minute epoxy or a tiny piece of miniature heat shrink tubing, so that if I do find the "right" position, the lamp will remain there! The copper is easily bent to reorient the lamp until the desired effect is discovered. Of course, with lanterns you are usually restricted in where and how you can position the lamp, sometimes just rotating the lamp on its long axis can make all the difference. Did I mention that you should take time to focus?
WARNING! Some cassette players pop, click, or throw out a sub-harmonic when you start or stop them! This can really "rip" lamps! With a tape in your player, listen carefully with headphones as you hit the play and stop buttons. If you hear anything at all, institute a policy right now to turn the volume completely down, EVERY TIME, BEFORE you start or stop tape.

Some of the IDH "Electric" Lanterns, shown "just about" actual size...
Designer's Notes:
A part of you will want to get started ASAP. I do not blame you! But IF you want to get creative with your new medium read on! The more you know, the more fun it is! After all, that is why you came here. You are creating an illusion, the illusion that there are actually flames in the lanterns in a scene. The more you understand about how the trick works, the better you (and your layout) will perform it! And, there are more illusions that you can create with the same soundtracks... read on.
About audio control of lighting...
- A light bulb lights when it receives a current flow at a voltage high enough to cause the filament inside it to heat up and glow. We can vary the brightness of a bulb when we vary the voltage to it. Although they prefer direct current (DC), light bulbs will light with alternating current (AC) just as well. A lamp plugged into the wall uses AC. Our houses provides 120 volts AC at 60 Hz (60 Hertz or alternating cycles per second). A light bulb does not care where its voltage and current come from. The source can be a battery, an outlet in the wall, or a device plugged into the outlet such as a power pack or train transformer. Or, it could even be the outputs of an audio amplifier!
- An amplified audio signal is alternating current! Its frequency might be anywhere between 20 Hz to 20,000hz at any voltage and current the amplifier is capable of providing. With electric FX, we simply hang a light bulb on the output of the amp, instead of a speaker. The voltage to the bulb varies directly with the voltage of the audio signal at the input to the amplifier.
- Something similar to this has been done before. Unfortunately, I cannot seem to find the reference for it, so I cannot give the author credit for his design (if anyone remembers, please let me know!). In essence it works like this. An FM receiver is tuned just off to the side of an FM station; the white noise between stations provides a constant lighting effect while the actual broadcast program bleeds through and adds a random flickering characteristic. The amplified resultant signal is then used to drive a miniature lamp(s). If the bulbs or lamps are small enough, for instance 1.5v grain of rice (GOR), they can be driven directly from the headphone outputs of a small Walkman type radio. This approach is cheap, easy and can be interesting, but try to avoid music stations. The rhythm of most music can become obvious, predictable, and unnatural looking. You might try tuning just off an "all classical" or "all talk" station for more random appearing effects.
- Part of the beauty of the electric fire application is that it is not critically dependent upon high fidelity audio reproduction, and is fairly "user friendly". Things like minor distortion, tape noise, and frequency response are all relatively unimportant (when compared with audio reproduced for listening), in that the effect will still work. Tape noise is not a problem, it "appears" like the FM white noise in the example above. Other low-fi factors like tape wow and flutter, if they are noticeable at all, could potentially enhance the effect.
- Although fidelity of reproduction is not critical, it is always better to go for the best quality recording possible. Significant distortion can noticeably compromise the effect, and should be avoided as much as is practical. Dynamic range and wide frequency response can make a visible difference in the effect from most lamps, so keep the recording clean. For instance, with any given lamp, the CD version almost invariably "looks" a bit better than the same program on cassette.
About scale lighting...
- You can do most all of the same things with scale lighting that the "big guys" can do with megabuck theatrical lighting! You can backlight, highlight, spotlight or any other static application used by professional designers. And, YOU can take all the time you need or want, and focus to your heart's content! We are working on an article that will describe the basics of lighting design, and define some terms for you. You work long and patiently on your models, they (and you) should benefit from every advantage that creative lighting can add. "Go dink, young man, go dink..."
About the placement of Lanterns & Lamps...
- "Electric" Inhabitants When applied to the interior of a structure, the "Electric" Lanterns soundtrack can suggest "inhabitant animation", or kerosene lantern interior lighting, or a fire in a fireplace. Each requires a slightly different approach and application. The actual "Electric" Inhabitants effect is another article/soundtrack altogether, but the Lanterns track can accomplish a similar effect when applied to the interior of a building. Two lamps, one tapped into each of the left and right stereo channels are hung up, and out of direct view, in a building (as shown below). The constant variations between the two lamps suggest both fire or lantern light, and movement within the building. Depending upon the relationship between the two lamp's intensities, both the apparent light source and resultant shadows seem to move, or suggest movement. The most striking part of this illusion is created by the light that escapes through windows (or doors, etc.). In effect, the window is the "aperture" of a natural FX projector. Depending on which lamp is dominant at any given moment, light from that lamp will be projected through the aperture (window, etc.) and out onto the surrounding ground, scenery, and buildings. The distance to surroundings amplifies the amount of movement around the building resulting in a startling amount of animation! By hanging the lamps in different positions you can exhibit a good deal of control over the effect, spend some quality time focusing your lights! You might try "gel"ing one lamp, or parts of both lamps.

- Kerosene Lantern Interior Lighting This one is simple! A single bare lamp is placed in the building (out of direct line-of-sight), in a position that a kerosene lantern might be placed in. You could gel this lamp with yellow in one building, leave it clear in another building, and gel it red in still another.
- A Fire in the Fireplace, or Stove This effect is similar to the "inhabitants" design above in that you apply two lamps/channels in the same building. The placement is different. To simulate a fire in a fireplace or pot belly stove you will install the two lamps low, near the floor. You will additionally place them close together, 1/4" or so apart. This close spacing better simulates the the type of light "thrown off" from an open flame. If your building has a chimney or smokestack, you will place both lamps below it. Gel the front half of one lamp orange or yellow, and the front half the other lamp red. In another building, gel one lamp yellow, and leave the other one clear, for a different look. The non-synchronized "mix" between the lamps produces a very natural, random, unpredictable, and believable effect.
- Line-of-sight (direct or indirect viewing) An electric flame should be viewed directly when applied as the flame of a candle, lantern, wick oil lamp, or a fire in a fireplace or fire box. In any case, the effect/illusion is the bulb itself, or more specifically, what we make the bulb appear to be doing! Any ambient lighting effects are just an added bonus. The lamp is a projector. The filament is the light source, the globe or crystal is the lens, and the viewer's eye is the screen! The "Electric" Lanterns soundtrack takes full advantage of the range of expression in miniature lamps. A dim glimmer of the filament appears smaller and darker to the eye, at full brilliance it appears to be larger and whiter. Nothing actually moves, but the flame effect appears to grow and shrink, as flames do. The illusion is preserved in part because the signal is constantly varying, the eye never gets a chance to analyze (or recover from...) one expression before the next one has taken its place.
- Star Filtering The glass globe/lens, because of its curved shape, often enhances the effect on the brightest flashes of the lamp by creating a star filter effect. This is similar to what you see when you squint at a light source (I think because you are focusing on a distant point of light through your out-of-focus eyelashes). Historically, photographers would "focus through" a nylon stocking stretched over the lens to achieve a star filter effect. You can see this effect in the photo of The Whitby Loco (look on the water feed to the injector, lower left). Luckily, the star filter effect from a miniature lamp is visible with you eyes wide open (no pantyhose necessary). Watch for it, you can use it to your advantage!
- "Hopscotch" Strings (see: Blueprint No. 41, below) A "tell" (or dead giveaway) is two lanterns on the same channel, in the same field of view! It may make installation easy, but it takes the magic right out of the illusion. Try to avoid a direct line-of-sight from any one viewpoint, to any two lanterns driven by the same channel.
BLUEPRINT No. 41 The Station at Summit design actually has eight channels of "Electric" Lanterns (two four-channel CD players set to "repeat" the same tracks), but the approach to lighting placement is the same. The idea is to never install the same channel twice within the same scene, or field of view.

FAQ&A: "All my lights go out when my deck auto-reverses (or crosses the splice point)".
I recommend doing a tight editing job, and living with the "free animation" of your lanterns randomly blinking off and on every once-in-a-while, but...
There are several solutions to this. You can have more than one FX system. At today's prices, you could be running two, staggered cheapo cassette headphone-driven systems on a smaller layout for under $30. Or, you can insure that by design every scene has enough constant or circuitry controlled lighting that the dropout is not missed. Or, you can get creative and fade in and out at the beginning and end of the tape, so that the undesired effect is not as noticeable.
Or, you can just live with the momentary blackouts... they can be dramatic or fun sometimes. After all, lanterns do "blink" in the wind, or flicker when the kerosene is getting low. This free animation adds a feeling of activity and magic as things happen all by themselves!
Here are a few suggestions for recording your cassettes in a way that will minimize these "black-outs". Before you record, look for the splice on the open edge of a continuous loop cassette tape, if you do not see it, shuttle the tape forward until you do. When you have found the splice, load the cassette back into the recorder, put the recorder into record, run it forward a few seconds and put it on pause. If you have a one-minute cassette, record for ninety-seconds and then hit pause again before taking the recorder out of the record mode (if it is a two minute loop, record for three, a three minute loop for four, etc.). You are deliberately recording "over" the splice and start points! This will minimize the drop out across the splice itself, and at the start/stop point too.
If you absolutely, positively cannot tolerate momentary dropouts in your "Electric" Lanterns, you can "mix" two cassette tapes together within a Dual Cassette Ghetto Blaster (see: Figure 5). Any delay between the two tapes will cover the splice, or start/stop dropouts on both. Just make two copies of the same tape. You will have to disconnect the internal speakers (possibly by snipping the wires), and "break out" the leads through a circulation vent (or hole you drill yourself). I have seen suitable dual cassette ghetto blasters for under $40.00! If you get a more expensive ghetto blaster with auto reverse, the two tapes will shuttle at different times... if you start them at different times. I have seen suitable auto-reverse dual cassette ghetto blasters for $79.95.
Figure 5
This is not a bad approach, everything is built-in. Just start the two tapes separately. Always check first, not all dual cassette players will play both tapes at the same time! The cheaper ones usually do (it takes less circuitry to leave both decks attached to the amps at all times).
![]()

I suppose you could also use digital delay lines (DDL) in-line with each channel, or two cassette players "mixed down into a single amplifier through Y adapters in an effort to eliminate dropouts. I must admit though, I have never tried either of these... I like the occasional flickering!
FAQ&A: "But what if I know the deck I'm using for playback will have noise reduction decoding, can't I use noise reduction when I make the copy, and get even more dynamic range?"
Good question! The answer is "maybe"...under ideal circumstances, the 3 - 6 db or so of additional headroom might be noticeable. But brighter is not necessarily better, you could start burning out bulbs. In fact, if you are using 1.5v lamps, you should never use NR. I had to do 7:1 compression processing to a program originally created for commercial applications, in order to squish it down into the smaller scale lamps. They have less "headroom", the lowest parts of the program were invisible, while the peaks were ripping filaments. You cannot go over 0 VU no matter what, and the noise floor no longer matters with electric fire FX! You simply do not need it! Noise reduction systems compress the signal onto a tape track; some systems do this in several separate frequency bands! Then they expand it back up upon playback. Given the nature of the electric fire program, NR could wreak havoc, or it could be splendid... I wouldn't know, I have never tried it. If you want to go through the extra steps, you can try it, carefully, in your own application. My guess is that you will not be able to see a difference. If your player has a smaller amp, you might think you need a "hot" tape just to fire the amp hard enough. Just record it hot, and try driving the amplifier into clipping (see: Enginear's Notes). By the way, if the headphone output is not strong enough to drive lamps by itself, you can use it to drive an external amp. Just start with the volume all the way down, and turn it up slowly. The headphone amp may not be able to drive a lamp by itself, but it can easily overdrive the inputs to an external amplifier so keep the volume low.
WARNING! Always eject the tape when the player is "parked" after use. Many players, especially car stereo decks, mechanically keep the capstan pressed up against the pinch roller when the power is turned off to the deck. Over time this can leave dents in the rubber pinch roller creating a terrible wow or flutter. The only fix for this is to replace the pinch roller. Be safe, and eject the tape after each operating session. This may not be a problem on most walkman and ghetto blaster type players, but check first to be safe!
Enginear's Notes:
The more you understand about what you are seeing and doing, the better your system will look to everyone, including you! These Enginear's Notes are designed to give you the background that will enable you to optimize many aspects of your installation. Yes, some of it is dry and technical. And, yes it may not be essential in order for your system work. Scale lighting is very forgiving, and in general, any lighting effect is still better than NO lighting effect. But so much creative effort went into the design of your soundtracks, that it would be a shame for you not to get the most back out of them.
This is NOT Audio-animatronics!
You cannot hear Audio-animatronics. Audio-animatronics had
nothing to do with audible sound. It was a simple way to synchronize
multiple animated events, with multiple tones on the same tape.
An audio tone was used to turn a circuit on, or off (called an
analog movement). Specifically, a sympathetic vibrating reed
relay switch closed an electrical circuit when an appropriate
pitched tone was present on a tape track. Multiple tones on each
track, and multiple tracks allowed for control and synchronization
of many events. Synchronization of tape decks allowed synchronization
of these events with the audible sound. This original Disney
animation control system has long since been replaced with microprocessor
control where feed back information reports to the computer so
that it can control speed relative to exact positioning (called
a digital movement).
Tech Notes from "That Dang" Dale:
The power going into a lamp is determined by the applied voltage and by the lamps resistance.
How much amp power is enough? .5 Watts is plenty if we're talking about an amp that can drive 8 Ohms - (see table 1, below) an amplifier that can deliver .28 Watts (1.5 Volts RMS into 8 Ohms) can drive up to 14 of the 1.5 lamps. Walkman outputs may be for 40 Ohm headphones or higher however, and the voltage may also be too low. If an output is able to handle a 40 Ohm load, it should be able to handle 3 of the cited 1.5 V lamps in parallel. Voltage may be a bit low, but see the note on clipping and RMS values below. It looks like an amp rated at 20 Watts/channel into 8 Ohms is best for 12 Volt lamps, even half a Watt per channel is more than plenty for the 1.5 Volt lamps. The amplifier power rating says two things - it tells us the minimum amount of voltage that is available with the amp driven to full power, and it tells us how many lamps we can run. If the amp can deliver the same voltage into 4 Ohms instead of 8, it can run twice as many lamps. For folks with amps putting out more than 1.5 volts but less than 12 volts RMS we might suggest groups of lamps in series. Not having a great deal of extra voltage available reduces the chances of blown lamps when someone pops in a Van Halen tape or turns the wrong knob...

How can I estimate the maximum output voltage and power of a portable or car stereo? A good rule of thumb is figure on the maximum peak-to-peak output voltage of a single amplifier being about 2 Volts less than the available power supply voltage. The RMS value for sine wave output is that peak to peak value times .354 (one over twice the square-root of two). Based on that, an amplifier using a 6 Volt supply can probably deliver enough voltage for using 1.5 Volt lamps. The power output into 8 Ohms is simply the RMS voltage squared, divided by the 8 Ohms resistance. Standard or bridge-mode car stereos/amps cannot put out enough voltage for driving 12 Volt lamps except when the better amplifiers running on step-up switching power supplies are used. Simply put, the low power supply voltages from batteries operation limit output voltages to relatively low levels. To get a bit more power at minimal cost, many automotive amps actually use a pair of amplifiers bridge-connected for each channel to double the output voltage (quadrupling the power). One sign that you have a bridge amplifier is that none of the speaker wires can be grounded. Bridging brings the output from about 2 Watts to about 8 Watts into an 8 Ohm load. It is common to use 4 Ohm speakers paralleled to 2 Ohms to increase power more by increasing the current delivered. The same output voltage across 2 Ohms corresponds to four times as much power as it would across 8 Ohms. Since the bridge amplifier is generally just one low-cost integrated circuit, bridge amps are commonly used in basic car stereos. A separate booster amp that is just another direct-battery-powered bridge amp won't produce any more power. For us, the ability to handle the current associated with a 2 Ohm load just means we can parallel more lamps, but the higher wattage figure doesn't mean there is enough voltage for 12 Volt lamps. By rating the amplifiers into 2 Ohms, combining the output figures for both channels, testing an amp on a 14 Volt or so supply, and perhaps driving it into clipping, some units may have claimed output figures of 65-125 Watts! They still don't put out enough to properly drive our 1/3 Watt 12 Volt lamps... The moral? When comparing amps use only the single-channel into 8-Ohms low-distortion ratings.
What about over driven amps? It should be noted that lamps don't care about distortion... just the RMS voltage. The RMS voltage for a square wave is 1.41 (square root of two) times that of a sine wave having the same peak value. So an amplifier that can't quite put out a lamp's rated voltage as a sine wave may still give acceptable results if driven into clipping. Since more RMS voltage is available with an amp driven into heavy clipping, there is that much more reason not to use amplifiers more powerful than needed to deliver the required voltage.
![]()
(RMS or DC voltage value squared, divided by load resistance)
Here are calculations/tables that will be illuminating when it comes to amplifier output voltage requirements, and the loading that the suggested lamps present...
1.5v lamps (for example, Circuitron # 800-7411-02)
1.5V * .013A = .0195 Watt
1.5V / .013A = 115 Ohms
Max # of lamps on buss to avoid going under 8 ohm load, about 14
Max # of lamps on buss to avoid going under 4 ohm load, about 28
Max # of lamps on buss to avoid going under 2 ohm load, about 57
12v lamps (for example, Circuitron #800-7440-06)
12V * .030A = .36 Watt
12V / .030A = 400 Ohms
Max # of lamps on buss to avoid going under 8 ohm load, about 50
Max # of lamps on buss to avoid going under 4 ohm load, about 100
Max # of lamps on buss to avoid going under 2 ohm load, about 200
About Portables and Car Stereos...
The stereos and non-switching-supply amps really don't put out enough for 12 Volt lamps, but the bridge-mode units should just be usable if driven into heavy clipping.
Based on the above table, an amp that can deliver 36 Watts into 4 Ohms (call it 40 Watts) could drive 100 of the 12 V lamps per channel. Note that an amp rated at 40 Watts into 8 Ohms is NOT suggested. The higher voltage associated with that amplifier would increase risks of accidental lamp burnout. If you have an amp that can put out much more than the required voltage, putting lamps in series to increase the voltage requirement can reduce the burnout risks associated with excessive headroom. For handling more lamps than a 40 Watt into 4 Ohm amp can handle I would suggest using multiple amps of the same type instead of a more powerful amp. That would avoid the riskier higher voltages.
 {
{